Saturday, 9 March 2013

Home made soda bread - Quick, easy and delicious!

I've been really missing eating bread since I found that both yeast and sourdough don't agree with me.  I was relegated to eating plain rice crackers or the occasional homemade pancake because of that.  

The other day, while making a batch of pancakes that used baking powder, I was reminded of making cornbread a while back.  That recipe called for baking soda and baking soda made me think of soda bread.  I looked up soda bread on the web and was led to Irish Soda Bread.  I chose a vegan recipe and got right to it.  Here are the ingredients I used. I list them at the end as well.


I put two cups of All Purpose Spelt Flour and 2 cups of Whole Spelt Flour into a mixing bowl with one teaspoon of baking soda and one teaspoon of salt.


You can add a quarter to half cup of your favourite seeds or seed flours.  I like adding flax seeds, flax flour and sunflower seeds.


I measured two cups of hemp milk although you can use any milk substitute or real milk.  Real Irish Soda Bread calls for buttermilk.  Whatever liquid you use, add 2 teaspoons of cider vinegar and let it sit for 5 minutes to "sour" it.


I created a bowl with the flour then started pouring in liquid in small amounts and mixing it with a wooden spoon (the wooden spoon is key, apparently).


Once the flour was thoroughly mixed I patted it into a ball.  I found that a slightly wetter, but not gooey or sloppy consistency works the best.  It should be damp but not too sticky on your hands.  I don't usually use the full two cups of liquid.


Place the dough into a lightly greased baking pan (I used a bit of coconut oil) and score the top with a knife making a cross.  I am not sure why you score it but it gives it that nice rustic soda bread look in the end.


Place in a preheated 425 degree oven, uncovered for 35 minutes.......... and voila!


It's delicious steaming hot right out of the oven.  Not sure how well it keeps yet as it does not last more than a day right now.


Here are the basic ingredients. 
  • 2 cups nut, rice or hemp milk, real milk or buttermilk
  • 2 tsp apple cider vinegar
  • 4 cups flour (usually whole wheat pastry flour but I used spelt flour)
  • 1 tsp baking soda
  • 1 tsp salt
  • Optional: 2 tbsp sweetener and/or 1/4 seeds, raisin, dried berries of choice.

I don't put in raisins; they feel like biting into a slug to me.  I stuck to the basics of the recipe and ad-libbed after that. Enjoy!

Misha

Wednesday, 6 March 2013

Subway tiles in bathrooms - Here we go again!

Subway tiles are timeless. We used them for our kitchen backsplash and I knew I wanted to use them again in our bathroom. I like to have consistency and a similar look/feel throughout the house. My favourite thing about subway tiles is that there are many accent pieces to choose from: chair rails, shelf rails, flat liners, bull noses, sanitary coves….It takes a while to get familiar with all the names and options but this board at the Tile Store was helpful for us to get started. 


 After a couple of days of consideration and a few visits to the Tile Store we came up with our subway tile order. We purchased Daltile’s Rittenhouse Square 3X6 subway tiles from Home Depot and matching 2X6 bullnose. We will be tiling halfway up the bathroom wall, so we also ordered 2X6 chair rails from the Tile Store to finish off the edges. I love chair rails; they are so charming. 

I also like the look of a baseboard in bathrooms so we picked up the larger 6X6 subway tiles and will top them off with 1/2X6 flat liners to create an illusion of a baseboard. Before our purchase I did a mock up by taping a couple of the subway tiles to the wall. It is still missing the flat liner between the tiles but we got a good idea of how it will look and we like it.


Mia


Monday, 4 March 2013

Bathroom floor tile - Dark grey or light?

I love the look of grey floor tiles in bathrooms. I was set on getting a dark grey tile and we brought home a sample porcelain tile from Home Depot. I liked the tile, but after living with it for a couple of days, I realized that it just didn’t work in our small bathroom. The dark colour shrank our bathroom and made the floor look much smaller. See what I mean? 

(Cinnamon loves to hang out with me while I am doing my reno planning).


I realized that I had to keep searching and look for a lighter shade of grey. We went to the The Tile Store and I absolutely fell in love with it. The selection of tiles is incredible. There is a large room packed with porcelain tiles that look absolutely identical to stone tiles. I love porcelain tiles because they require no sealing/maintenance, come in beautiful colours, are affordable and are a more sustainable choice. 

It didn’t take us long to find our tile. Actually, Misha pointed it out as soon as we walked in the store. When I first saw it, I loved it but I thought a darker shade might be closer to my vision. We searched through the whole tile selection but kept going back to it.  We ended up ordering it and I know we made the right decision. It’s a beautiful semi-polished light grey porcelain tile. It is on the pricier side at $7.16/sq feet, but luckily we only need a few to cover our small bathroom floor.  We can afford to splurge this time.

Our final choice - the top tile on the right

Mia

Wednesday, 27 February 2013

Door knobs - From brass to black

While the movie scene was buzzing with the Oscar ceremony I was happily replacing our door knobs.  I wasn’t even thinking that I was missing out on anything. It occurred to me that I might be a bit renovation obsessed. When I asked Misha what he thought, he said “no, you are just passionate”. I love how supportive he is.

This is what our original door knobs looked like. They must have been as old as our house.  They were worn, tarnished and ready to be replaced.

BEFORE - Our old door knobs
We considered all options for the new knobs; brass, antique brass, silver, black, crystal, ceramic and oil-rubbed bronze. We landed on a black finish given that our kitchen cabinet handles are black and it would work well for our space. We decided to splurge a bit and picked up the pricier Weiser Troy door knobs with iron black finish from Lowe’s. They had more detail than other less expensive knobs and we liked their more delicate look.

The new door knobs came with detailed instructions and the installation went smoothly other than a couple small challenges.  A few of our knobs had hidden screws and we had to research online how to remove them. We also had to run to Lowe’s to pick up a door installation kit as some of our door knob holes were too small and we had to enlarge them. This was the end result.


AFTER - Our new Weiser Troy door knobs

This was one of the most fun projects we did. It was quick, easy and came with a great pay off. Our doors got instantly transformed from an outdated 60s look to a modern-country feel. We love how a simple thing like a door knob just finishes off the whole look and feel of our house.

Mia

Wednesday, 20 February 2013

The toilet hunt

I never realized how complicated buying a toilet could be and how quickly modesty is flushed down it.  I often do my best thinking on the toilet and these display models allowed me to do that and do some field testing.

Toilet researching

When looking at toilets we had to consider a lot of factors that we had never really thought about; MAPs, shapes, height, water usage...phew. This sign at one of the stores was helpful in getting us started.

Toilet ratings

We started with looking at the height of various toilets. You can go as high as 17 inches.  We found out that the higher toilets are for taller people (duh!), and for the elderly as it is easier to sit down and get up from.  The 16 inch felt good to me but we don't want to leave any of our guests with their legs swinging in the wind when they sit down so we will probably go with the 15 inch.

The next factor we considered was the amount of water used per flush.  The standard these days is 6.0 l per flush but you can get a toilet that uses as little as 4.8 l per flush.  We considered dual flush toilets but were told there is just more to go wrong on it so we will likely settle with the standard single flush.  We also adhere to the "if it's yellow let it mellow ..." protocol which saves us more water than flushing a dual flush every time.

So many choices; how to decide?
Another monumental decision is whether to get a round bowl or an elongated bowl.  Since we have a small bathroom we are considering the round bowl which will extend 2 inches less from the wall than an elongated bowl.  We found out from a helpful sales person that the elongated bowl is designed to be more comfortable for males to allow more room for their monuments when sitting on the toilet and reduce the chances of bowl contact. Hmmm, we may have to reconsider this.

Now it's time to get down and dirty and talk MAP (aka Maximum Performance Testing).  We had a delicate and mildly awkward conversation with a salesperson about this issue where the words "solid waste" and "number 2" were substituted for the more colloquial poop, crap and shit. Discussing the mass of a bowel movement was a bit unfamiliar and odd but we needed to sort this out if we were going to choose the right toilet for us. So here is the skinny (or the fat) on poop.  Most piles are less than 350g and this is the minimum mass that must go down in one flush to be MAP approved.  The best toilets are rated 1000 MAP which means they will flush 1000g (2 lbs.) of solid waste in one flush.  This is much more than most humans produce even considering toilet paper.  To be on the safe side we will likely go with a 1000 MAP toilet to avoid the water waste of double flushing.

So far, Kohler's Cimarron and American Standard Cadet 3 are at top of our list but we have more research to do.

Kohler Cimarron vs. American Standard Cadet 3

Do you have a favourite toilet you can recommend?

Misha

Monday, 18 February 2013

Bathroom renovation - The beginning

Our kitchen is done and the next project on our list is renovating our bathroom. Our bathroom dates back to the 60s, with a particle board vanity made by the previous owner and 2 layers of linoleum flooring. When we moved in two years ago, we stripped off the wallpaper, repainted the walls and removed some cabinetry. It wasn't a top priority at the time but now we feel it's time for a new look. The bathtub faucets are also not working well and we are concerned about the water wastage due to the leaking taps.

The space is tiny and we discovered that the 60" x 27" tub we have is not in production anymore and we can only get a 60" x 30" tub. The new tub will take up more room in our small bathroom so we will really have to be creative in fitting everything in and still making it look good. We are up for the challenge, though. Wish us luck!


Mia

Saturday, 9 February 2013

Dried beans

Beans are one of Mia's favourite foods from the garden. They are easy to grow, don't require much care and are easy to store once dried. She practically lives on beans the whole winter so each year we expand our bean growing operation to accommodate our growing appetite for them. 

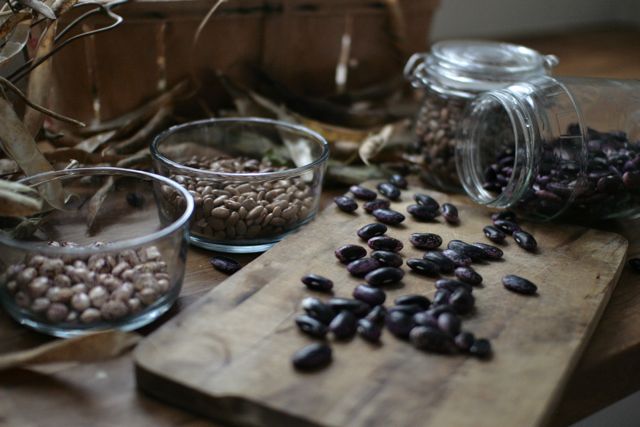
This year when we harvested our  fresh beans we left some on the vine to dry. Later in the fall when the seed pods turned brown and the beans rattled inside they were ready to hull and store. 

We hulled most of our beans in the fall but didn't get to the Scarlet Runner beans until now. They had been sitting in the mud room then on our kitchen counter for a few months.  I finally finished them today standing in our new kitchen with sunlight streaming in through the windows.  I find hulling them relaxing.  I love the sound of the pod cracking open and the beans dropping into the bowl. 


We have a variety of dried beans this year. The Italian Borlottis beans are delicious in soups and grown only as dried beans.  The Scarlet Runner, green and yellow beans are often eaten fresh when young but can also be harvested as dried beans.

Our bean harvest

We will definitely experiment with growing some new bean varieties like white Lima beans and Pinto beans this year. Our ultimate goal is to grow enough beans as to last us throughout the winter and spring.

Misha


----------------------------------------***..............................................***************************************************************222222222222222222222222222222222222222222222222222222222222202222222222222222222222222222222222222222200000000000000000000000000000000000000000000222222222222222222222222222220002..................003
.s,  as they jynfkm,☻22222222222222222222227444++781e such a versatile, nutritious and easy to use