Friday, 4 January 2013

Garden pests of 2012


Our spring garden started out well ...

Spring back garden

Spring kitchen garden
... but little did we know there was trouble brewing for our young vegetables. A variety of pests and critters would descend on our garden and we were hard pressed at times to manage them with our limited knowledge and commitment to organic practices. 

Here are the list of invaders we encountered in this past year:

1. Leaf Miner
The Problem - Leaf Miner causing spinach leaves to yellow and die.
Leaf Miner damage

The Solution -  Pick infested leaves and throw in garbage.  Do not compost.  Continue daily picking until no evidence of infestation.  Problem can be solved within a week.  We had a similar problem with the beets and I solved it the same way.

 Healthy spinach growing after pruning off infested leaves.

2. Cabbage Loopers
The Problem - Cabbage Looper caterpillar eating cabbage and broccoli leaves.
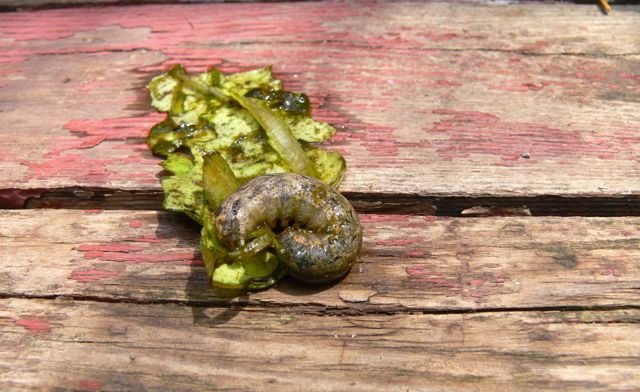
This is the caterpillar that grows from the larvae of the white cabbage moth.
The Solution - Hand pick caterpillars, encourage bird predators, catch white butterflies before they lay their eggs.

3. Flea Beetles
The Problem - Flea Beetles eating tomato plant leaves and stunting their growth.  The Flea Beetles are the small silvery black specks on the leaves.

Tomato plant ravaged by Flea Beetles
The Solution - I received a variety of advice from my online gardening friends and I tried them all.  I disturbed the soil by howing then mulched around the tomatoes to disrupt the flea beetle life cycle.  I then planted lovage, parsley, marigold and basil to act as trap or repellent crops.  Other suggestions were vacuuming them off the plant,  applying diatomaceous earth around the plant and spraying horticultural oils. I am not sure which intervention worked but the tomato plants recovered.  

Healthy plants after a variety of treatments.
4. Slugs
The Problem - Slugs are probably our greatest challenge. They can consume a whole cabbage and strip the leaves from bean plants.  Here are the small ones that we hand picked at night with head lamps and a drowning jar.

After a night of slug hunting!
Imagine our shock to find this monster in our garden.
This guy is scary!
I did not realize slugs this size existed.  Not sure if it was the size but I could not bring myself to drown these mammoths so I practiced catch and release and let them go in the local ravine as I walked to the subway.

The Solution - We have tried numerous strategies including hand picking with headlamps at night, orange peel traps, watermelon peel traps and beer traps.  The orange peels seemed to work the best as a passive trap.  
Giant slug in orange peel trap at night
Other organic suggestions to try are diatomaceous earth, coffee grounds, egg shells and attracting frogs and toads by digging a pond (I’m still working on Timea for the pond option).  Still debating whether to use what is reputed to be organic slug bait but not sure about the ingredients.

5.  Ground Hog
The Problem - There are ground hog holes under our neighbours' sheds and garages adjacent to our property.  We were the most vulnerable from the west side where the fence does not go right to the ground. Here is some of the damage to the broccoli; they ate it right down to the stem!


Broccoli plants chewed down to the stem
The Solution -  We bought some chicken wire and dug a 1 foot deep trench under our west side fence.  We attached the chicken wire to the bottom of the existing fence then buried the chicken wire.  

It felt like we were digging in for an enemy assault, but it worked.
6. Squirrels
The Problem - Squirrels love to dig holes in the garden in spring often digging up recently planted seeds and seedlings.  

The Solution - I found that sprinkling bloodmeal over the garden stops this activity really well.  Yes, it is dried pig’s blood.  Cayenne pepper sprinkled or sprayed can also work for the vegetarian purists.

The Problem - Squirrels were eating all the seeds from our sunflowers.  

The Solution - Cover the sunflower heads with chicken wire.  Ensure that the chicken wire is attached securely as the squirrels managed to remove the wire from some of the sunflower heads.  Next year I will attach  the chicken wire more securely and pick the sunflower heads sooner.

Make sure to secure the chicken wire well as the squirrels are adept at removing them
The Problem - The squirrels are also prime suspects, along with slugs and earwigs, in chewing off the first leaves of the bean plants leaving only a stem.

The Solution - The only solution I found for this was to plant mature seedlings rather than seeds.

Our mudroom grow-op
Conclusion
Despite the plethora of pests, we had a great harvest this year with minimal interventions.  Overall, pests had only a minor effect on our crops; the drought, over-intensive planting and lack of time were bigger factors. I have determined that the approach with pests is not extermination, but keeping them and the garden in balance.  Pests can devastate a crop but they can be managed effectively with eco-friendly methods.  It has been a fun challenge, kinda like Sam Sheepdog and Ralph Wolf at times, but in the end we had a great crop.

Summer back garden

Summer kitchen garden

... and we are still eating kale from the garden!
Still picking and eating the wonder kale on January 1, 2013

We look forward to planning our garden for 2013 and exploring new organic pest management practices.

Lessons Learned:
  • Plant seedlings instead of seeds when possible to give plants a head start. 
  • Plant companion plants and decoy plants to keep pest from your crops.  
  • Plant a variety of vegetables in your garden to avoid over population of one pest.  
  • Keep plants healthy with good soil and adequate watering.  
  • Rotate crops each year.  
  • Visit your garden regularly to catch problems early.

 Misha


Tuesday, 25 December 2012

Christmas Day treat for the birds

We had a couple of apples sitting on our kitchen counter for a few weeks.They were getting old and wrinkly and I was wondering what to do with them. I read an article in my favourite country magazine about making a winter treat for birds from leftover fruit.

I got really excited about the idea and snuck down at 6:30am on Christmas Day to check online whether birds in our region eat apples. Apparently, they do. To make the feast even more festive I decided to use up some leftover cranberries.


I cut the apples in half and removed the seeds; I read that they might not be that good for birds.


I hung the apples on a jute rope and tied a spruce sprig on the bottom to keep them from sliding off.


I strung the cranberries to create a garland.


With Misha's help we tied the treats to our apple tree in our back yard. The tree is the birds' favourite stopover before landing on our bird feeder. 


Hopefully, the birds will enjoy this little Christmas Day treat.


Mia


Sunday, 23 December 2012

Natural Christmas tree ornaments

In a week, we went from decorating our tree with lights and ornaments from a big box store, to returning them all and making our own natural decorations.

We originally bought lights and glass ornaments from a local store. We strung the lights but once we plugged them in we found them too harsh and bright.


Misha happily agreed to take the lights off as he had been grumbling about bringing more plastic into the house. We removed the Christmas lights and finished decorating the tree.

The next day, as I was looking at our decorated tree, I thought it would be fun to make our own natural ornaments like in the old days. We could use pine cones, walnuts, oranges and cranberries. I showed Misha a couple of pictures of what I meant and he jumped right at it.

We returned all the store bought ornaments and got ready to make our own. We sliced and dried oranges, tangerines, lemons, limes and grapefruits ...


 ...strung up fresh cranberries...


...glued ribbons to walnuts and pine cones...


... and made a star from twigs, jute and ribbon.


Our kitchen was like an old fashioned ornament factory. The delicious aroma of the drying oranges mingled with the scent of the balsam tree and a beeswax candle to fill the house with a festive feeling of comfort and joy.

We hung the ornaments on the tree and  placed the home made twig star on top. The tree came alive with natural textures, colours and aromas. We love how all the ornaments are plant based and can be composted or used to feed our backyard birds. Now that we know how easy and fun it is to make our own natural ornaments we are already excited about new ideas for next year.

We wish you all a happy and peaceful holiday season!

Mia and Misha

We will post a separate 'how to' for those that are interested in knowing how we made the ornaments.


Natural Christmas tree ornaments


Sunday, 16 December 2012

Festive front door arrangement

Since being shut down by Mia recently from buying greenery for our festive planter I have been on the lookout for free and sustainable materials for holiday decorations. We saved another $25 today by using branches trimmed from the bottom of our Christmas tree to make our front door arrangement.


I persuaded Mia to go for a walk in the nearby ravine and collect some dead materials to decorate the branches.  Armed with an umbrella, camera and clippers we headed into the ravine.


It didn't take us long to find some interesting dried plants. We picked up some dried up burdock.


 ...and some sumac seed heads. Sumac has a beautiful deep red colour and a velvety stem. The seed heads can also be steeped to make a high Vitamin C wilderness lemonade.


We collected some other dried plants and brought them home to add to the branches. Mia used jute and natural burlap ribbon to tie the arrangement together and hang it beside our front door.


All free, all natural, all sustainable front door decoration.  Savings- $25.  Fun putting it together- priceless!

Misha

Sunday, 9 December 2012

Christmas tree shopping at IKEA

We picked up our Christmas tree today. It has been a three year tradition for us to get a live tree from IKEA. Their selection is great, the price is right at $20, you get a $20 IKEA coupon and IKEA donates a portion of the sales to Tree Canada. We like the taller ones that go right up to the ceiling in our living room; for us the "taller the better".

Christmas tree selection at IKEA

We were quick this time; it only took us 10 minutes to spot the ONE. It's tall, bushy and smells incredible.


We also picked up two boxes of UNICEF Christmas cards at IKEA. We don't usually buy paper cards but these are made with trees grown with sustainable forest practices and recycled materials. The best part is that the money goes a long way. You can read on the back of the boxes what your contribution gets. On our cards it says that the purchase of these cards can provide Vitamin A doses to 64 kids.

UNICEF Christmas cards from IKEA
We needed to buy a tree stand as well. Misha is in his "let's not buy any plastic" phase so we got this steel tree stand instead of a plastic one from Lowe's. I must admit, it's a bit too red for my taste, but the price was right and Misha threw in the "it's the same one I had as a kid" line, so we just had to get it.

Christmas tree stand from Lowe's

Our tree, tree stand, decorations and cards are all home now. Next weekend it's time to decorate.


Mia

Sunday, 2 December 2012

Front porch Christmas decoration

December 1st is our official Christmas decoration start date. We drove by Home Depot to check out their outdoor decorations. Misha got really excited at the sight of the live evergreen Christmas wreaths and was ready to spend $40 on three different ones. I suggested that maybe we should try to make them ourselves instead of spending money on ready made decorations. He accused me of being a Grinch but reluctantly agreed to my idea.  

To get some decoration ideas, I popped into Goodwill on my way home from work. I spotted Rudolph for $3, to which I couldn't say no to, and this amazing clay pot for only $6.
Goodwill finds - Rudolph and a clay pot

They both quickly made it into the official Christmas decoration inventory. The clay pot made its way to the front porch.

Clay pot waiting for the decoration

We picked up fallen branches, collected some dried up garden flowers and arranged them in the pot.

Christmas pot arrangement

We thought maybe a bit of colour would do it good so we added some red Christmas ornaments and a ribbon and voila...... this year's porch decoration is all done.

Front door Christmas decoration all done

Christmas decoration on the porch
Rudolph gets a spot too

Cost for this project was only $8.00; $6.00 for the pot and $2.00 for the ribbon and ornaments.  We will reuse the pot in the spring. The rest of the materials were free, found in our garden or neighbourhood.  For the decoration we used:
  • Fallen pine boughs picked up by Misha in the neighbourhood
  • Apple tree twigs pruned from our tree last spring
  • Pine cones collected from the neighbourhood and our yard
  • Dried up Black-eyed Susan from our backyard
  • Red Christmas ornaments and a red ribbon from the dollar store

We had so much fun making this decoration and love the way it turned out. We keep taking quick peaks at it from our front door.  It creates such a lovely, festive ambiance.


Mia